|

 Many changes have
been made since its first introduction in 1991. With
slight variations and assorted improvements, this procedure is a
wonderful option for the right candidate. Some variations
may be apparent from surgeon to surgeon, including anesthesia
choices, preferred implant placements and preferred implant
manufacturers. You will have decided upon your anesthesia
choice at the pre-operative appointment however, many surgeons
do not offer a choice per se, and prefer their standard
anesthesia method. Please discuss this issue with your
surgeon. Many changes have
been made since its first introduction in 1991. With
slight variations and assorted improvements, this procedure is a
wonderful option for the right candidate. Some variations
may be apparent from surgeon to surgeon, including anesthesia
choices, preferred implant placements and preferred implant
manufacturers. You will have decided upon your anesthesia
choice at the pre-operative appointment however, many surgeons
do not offer a choice per se, and prefer their standard
anesthesia method. Please discuss this issue with your
surgeon.
|
|
When
you arrive at the hospital or private surgical center
you will have your blood pressure taken, last minute
medications given (such as anti-nausea, sedatives or
other drugs), clinical before photographs are usually
taken and other necessary preparations. You will
meet with your surgeon again and discuss any last
concerns or determine any last size conclusions.
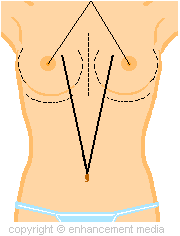
Your surgeon will more than likely mark your body and
breasts with a surgical marker. Such markings may
look like any combination of markings in the diagram to
the left. Surgical markings vary from surgeon to
surgeon or you may not be marked at all.
Some surgeons will mark their patients after they have
been sedated rather than before; this is purely a
preference as both are accepted.
You are
then either brought to the pre-op room where a nurse may
insert an I.V. (intra-venous) catheter which will be
connected to a saline drip or brought directly to the
operating theater. If you were tended to in a
pre-op room, after your I.V is inserted you will more
than likely then be wheeled or allowed to walk into the
operating theater. |
Once you are on
the table the anesthesiologist or C.R.N.A. (certified registered
nurse anesthetist) will attach adhesive patches with electrodes
to your body which will be hooked up to the monitoring equipment
to keep an eye on your breathing, pulse rate, blood pressure and
other vital statistics. Some surgeons may use a BiSpectral
Index (BiS®) which is a sensor device placed on the forehead to
monitor the brainwaves of the patient. This is considered
more accurate than traditional methods in determining the
patient's specific anesthetic needs. For more information
please visit http://www.aspectms.com.
You may be given
gaseous anesthetics or intra-venous anesthetics. You may
have a mask placed over your mouth and nose and be instructed to
breathe deeply and count to 10, or you may be given the
intra-venous medications (such as Fentanyl) and become very
drowsy. After you are sedated, you may either continue to
receive intra-venous medications or be intubated for gaseous
sedation (usually General). Your vitals are noted again
and the anesthesiologist or C.R.N.A. will then determine if you
are fully sedated and ready for surgery.
|
|
Your
surgeon and the operating technicians will then begin to
scrub your abdomen and breasts thoroughly with a
solution of polyvinylpyrrolidone and iodine such as
Betadine™ solution to kill any surface bacteria.
This will lighten the surgical markings but will still
be visible to the surgeon. Your
surgeon will then inject local anesthetics (and possibly
epinephrine) into the incision area and breast area.
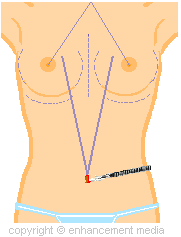
He or she will then make the incision in the umbilicus
(navel) in the shape of a J or C and dissect the tissue
around the umbilicus (left).
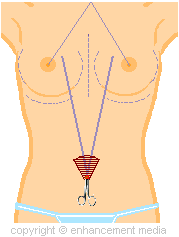
The
dissected area around the umbilicus is depicted with
maroon lines on the graphic to the right. This
enables enough room for the insertion of the endotube. |
|
|
|
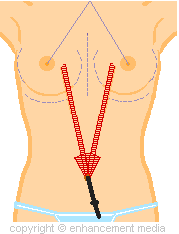
Next,
your surgeon will then insert an endotube which
will be used to tunnel from the umbilicus to the
breasts. Blunt dissection is used to separate the
fat and skin from the muscle fascia from the
navel entry point to beneath a predetermined point
underneath the breasts. This may include
dissection of the pectoralis major from the chest wall
for sub-pectoral implant positioning. The
dissected tunnel areas are depicted with red lines.
After and
sometimes during the formation of the tunnels or general
dissection, an endoscope, which is a small camera, will
be inserted to ascertain the correct formation and
placement of said tunnel. Once the endoscope is
inserted through the navel, your surgeon will be able to
see via a monitor where and what has been done or what
still must be done in order to achieve a properly placed
tunnel and pocket.
|
| After
the tunnels have been successfully created either above
or below the pectoral muscle (depicted as bright red
tissue above the ribs), the endoscope is removed.
The diagram to the right depicts the endoscope being
inserted through the tunnel, under the breast, to
determine if the pocket will be centered. This
placement will be sub-glandular however it is just as
easy to place the implant under the pectoralis major.
There will be a long fill tube attached to the valve
through which it will be inflated. Next, a tissue
expander, will be rolled up on both sides like a
scroll so that it will easily fit within the endotube or
the implant can be pushed up without the use of an
endotube. |
|
|
|
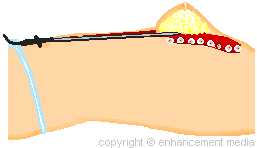
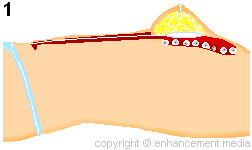
The
expander is either placed through the endotube or pushed
through the abdominal tunnels on its own and situated
under the breast tissue or pectoralis major muscle and
breast tissue (diagram 1). The expander is then
inflated (diagram 2). |
|
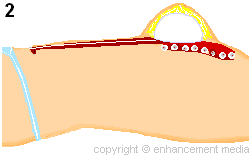
In this
case the tissue expander has been placed in the sub-glandular
position. Your surgeon fills the tissue expander with either
saline (or air) using an electric liquid pump for saline or
large syringe for either. The
tissue expander is filled approximately one and one-half (1 1/2)
times the desired end volume. The breast and connective
tissues will slowly separate from the underlying muscle for
sub-glandular placement or from the chest wall for sub-pectoral
placement. Your surgeon will may further situate the
tissues with manual compression and by pushing the implant to
each quadrant of the pocket. This will create an oversized
pocket necessary for natural movement. After the tissue
has been successfully expanded, the expander will be deflated
and removed.
|
|
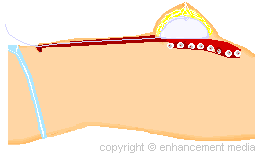
Your
surgeon will then insert a long fill tube into an empty
breast implant and will then be rolled up just as the
tissue expander was. After
the implant has been rolled up it will then be inserted
into the end of the endotube or placed through the
tunnel without the use of the endotube depending upon
your surgeon's preferred method. This way the
breast implant will be inserted and placed just as the
tissue expander was. After the breast implants
have been positioned inside their respective pockets
either under the pectoralis major muscles or as in this
case, in the sub-glandular position your surgeon will
prepare to fill them.
Using a
large syringe in combination with a closed delivery
system, sterile saline is then injected into the breast
implant. Your surgeon will take note of the cubic
centimeter (cc) volume of sterile saline which will have
been determined beforehand for your desired size goal
but may be altered intra-operatively. Your fill
tubes will be left in until the last phase of the
surgery.
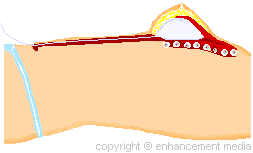
Subpectoral
implant placement is depicted at the left bottom for
comparison. |
| Your
surgeon will then possibly elevate you to a sitting
position to further determine if more saline is needed
in either side, to check for symmetry and placement of
the implants. If the amount of saline is correct
the fill tubes are removed by a gentle but firm tug of
the tubes and the implant valve is then sealed. If
not, more saline is injected to create a symmetrical
appearance. All patients have a degree of
asymmetry although some may have more pronounced
imbalances than others. The diagrams depict a anterior-valved
(the valve on the front, being up under the nipple area)
breast prosthesis.
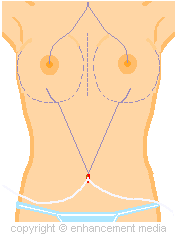
Your
surgeon and his operating room staff will then perform
an instrument and sponge check to determine all items
are accounted for and the incision line is then sutured
closed. Some surgeons may insert a small latex or
silicone drain or tube which may drain onto a thick
gauze dressing. Some surgeons may even use large
"maxi pads" as drip pads. Sometimes the
drain is left in for 1 to 3 days and will be removed at
your first post-operative check up. |
|
|
|
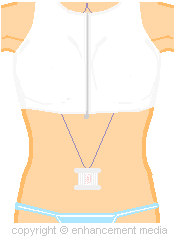
You are
then possibly dressed in post-operative gear such as
surgical bras and possibly further wrapped in an ace
bandage. Some patients may not be dressed in these
garments for reasons such as in very small-breasted
patients which may need gravity assistance for proper
settling of the implants. Some surgeons utilize
waist wraps for further assurance of abdominal skin
adhesion.
 Sometime
towards the end of the surgery, and usually before you
have been placed in your support garments the
anesthesiologist will cease intravenous feed of the
anesthetics or give you medications to reverse their
affects and you are gently woken up and brought to the
recovery area. Please visit our recovery
section for what to expect during the healing phase. Sometime
towards the end of the surgery, and usually before you
have been placed in your support garments the
anesthesiologist will cease intravenous feed of the
anesthetics or give you medications to reverse their
affects and you are gently woken up and brought to the
recovery area. Please visit our recovery
section for what to expect during the healing phase.
|
home
 procedure history
  about the procedure
  advantages
  risks & complications
  misconceptions
  breast implants
surgery preparation  the surgery
  your recovery
  FAQ
FAQ  journals
(Updated on 02/23/10)
© 2009 - 2015 Ceatus Media Group LLC
Images and text on this site belong to Ceatus Media Group. Copying or reproducing any text or graphics from this website is strictly prohibited by copyright law. Please read our copyright infringement policy.
|